
How FarEarth corrects geometric & radiometric anomalies
- Mar 27
- 3 min read
Updated: 5 days ago
Let us look at how the FarEarth platform compensates for anomalies. FarEarth addresses corrections in different phases of your mission and at different stages during processing. Read the previous blog, where we discussed anomalies in Earth observation missions.
Pre-launch
We recommend that you test your camera to obtain a series of lab test datasets before you launch.
These datasets help us to identify any potential issues with your imager. Common issues include faulty detectors (pixels) and optical aberrations. With this information, we will recommend scanlines and initial sensor configurations before you launch. Given all these datasets, we model spatial distortion and the required corrections.
Before launch, you will receive a Camera Validation Report with findings and recommendations.
Note: sensor manufacturers often do their own lab tests for each camera
In-orbit calibration
During the commissioning of your satellite, you will finalise the configuration options for all scientific instruments on board. During this phase, you will start acquiring a series of calibration datasets. We will recommend acquisition sites. With these datasets, we model geometric and radiometric anomalies for your satellite.
Geometric calibration sites allow us to determine the exact alignment of each detector on the instrument relative to the attitude instruments. We calculate a boresight vector aligned with the ADCS, and then a line-of-sight model for each pixel relative to it. This will compensate for any lens distortion and other optical geometries in each spectral band.
Radiometric calibration sites and dark-scene acquisitions allow us to model the sensitivity for each spectral band. This, together with the spectral response functions obtained during the lab tests, allows us to understand what the “digital numbers” that the sensor provides mean in terms of radiance values. We do this for every active detector.
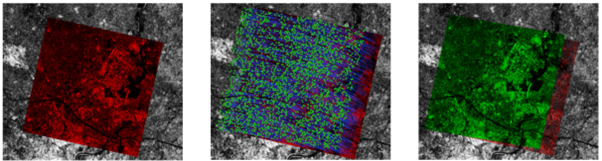
In the images above, the left is the initial systematically projected image, the centre shows the tie-points between the central band and the reference image, and the right shows the before (red) and after (green) boresight-aligned central band.
During normal operations
The first step is to create a Level 0 product from your raw data, extract useful information, and detect issues such as missing data and pixel readout timing anomalies.
During Level 1A processing, FarEarth corrects for varying detector responses measured during calibration, accounting for dark-signal non-uniformity (DSNU), photo-response non-uniformity (PSNU), and fixed-pattern noise. We compensate for random noise and temperature effects and compute initial image alignment using attitude and position sensor data. We mask and filter under- and oversaturated pixel values.
During Level 1B processing, we refine the image’s geometry using reference data to align the pixels precisely, correcting for incidence angles, terrain variability, lens distortion, and random errors such as timing fluctuations and vibrations.
When creating the Level 1C product, FarEarth calculates each pixel's position and resamples the data to a regular grid. This orthorectified map-ready product is now usable in various applications.
We create a Level 2 product to compensate for atmospheric effects on imagery by incorporating information such as ozone, water vapour content, aerosols, solar and viewing geometry, and emissivity that influence reflection or emission, using radiative transfer models like MODTRAN and 6S.
FarEarth continuously calibrates your camera and compensates for any anomalies. The platform creates high-quality image products that are accurate over time and across your satellites. Image products include industry-standard metadata and quality metrics.
For more information about the processing algorithms, refer to: Our science | Knowledge Hub


